
Over the years I have tried countless screenwriting applications on both my MacBook Pro as well as my iPad. Unlike when I was in college where it seemed like there were only 2 screenwriting app choices, there are a ton of solid choices now.
Accessing screenwriting apps is no longer the challenge, choosing the right one is. For the past couple of years, the app I have done most of my screenwriting in has been Scrivener. You may have heard of Scrivener as it is popular among many novelists and other writers. Although the screenwriting features are not what has made it as successful as it currently is, they are very powerful if you know how to make the most of them.
Here are 5 Scrivener tips for the screenwriter that I wish I knew or implemented when I first started with it.
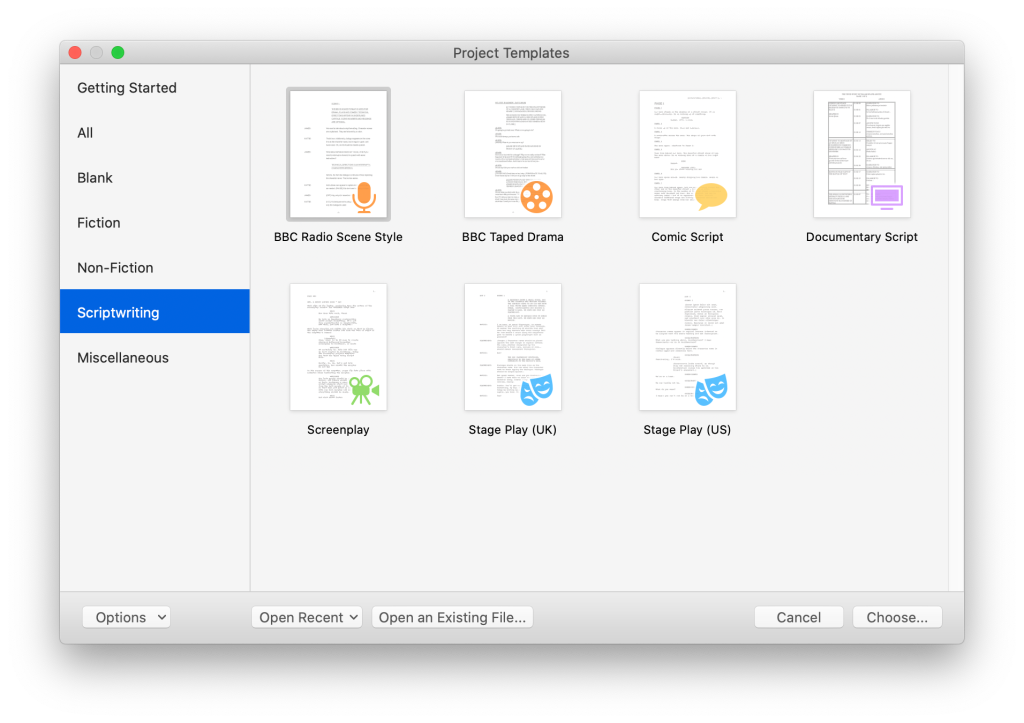
Most of these tips apply to a screenwriting project but might help anyone writing in Scrivener. When starting a screenplay in Scrivener I suggest starting with the Screenplay Project Template that Scrivener provides.
1. Customize The Template Sheets
I love the idea of having documents that have information on each character and setting but when I first looked at the Character & Setting template sheets in the Scrivener binder I felt a bit overwhelmed. Those initial sheets had a ton of info I wouldn’t need or just wouldn’t care to figure out. If you feel the same way then I suggest you customize those template sheets. The entire sheet can be changed. You can add more info. You can have less info. You can change the appearance by adjusting the font and color.

Customizing these sheets will help you take ownership of your Scrivener project. Making it match your personal style preference or match the mood of the story you’re writing can be great motivation and at the atmosphere as you’re working through your masterpiece.
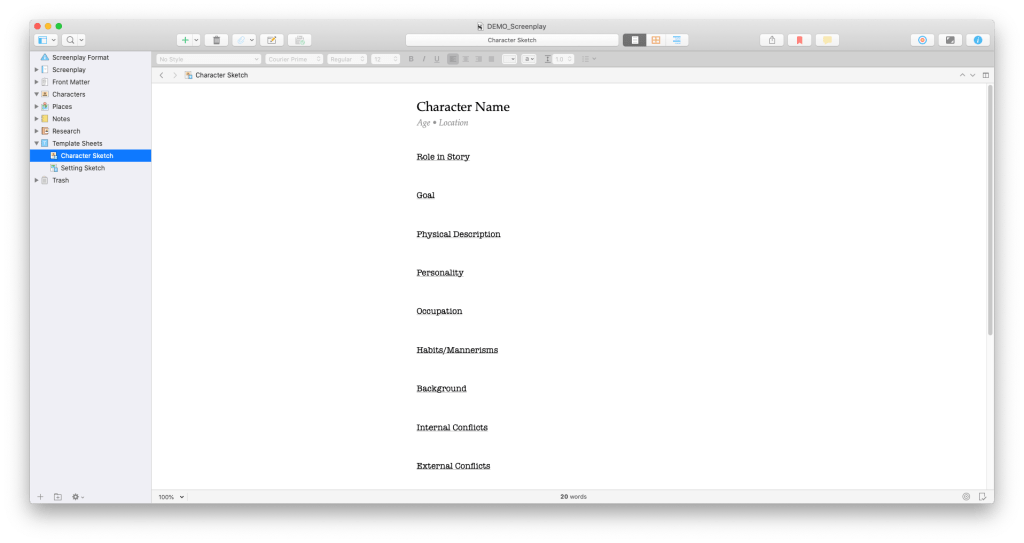
After customizing mine I found them more inviting and useful for me.
2. Modify Script Settings
I don’t know about you but when I write I love any hack or setting adjustment that helps me get into a flow and stay there. One of the ways I do this is minimizing any extra keystroke or mouse move.

Scrivener allows you to make a ton of customizations on each script element. You can get lost in the amount of options. One of the most important changes I made here was to change what happens when I press the return key after a writing a piece of dialogue. By default the cursor moves to the beginning of the next line so you can write an action line. If I want to continue writing dialogue then I have to tab back to the dialogue element. Doing this once is nothing but doing this after every line of dialogue gets annoying.

Instead I change this setting to make the cursor go to the character element after I hit the return key after writing dialogue. This allows me to stay in the mode of writing dialogue. Often times the dialogue in my scripts are a part of conversations with more than one person talking. Being able to go from one character speaking to another easily makes writing these scenes enjoyable.
3. New Scene = New Document (or sheet)
When you’re writing your screenplay in Scrivener you write the entire script in one document which is what we’re all used to. Scrivener gives you another option. That option is to easily create another document (within your project) for each scene in your script.
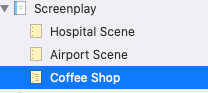
Doing this allows you to easily rearrange your scenes in your script. Whether its in the re-writing stage or even during the writing stage, I find myself deciding to reorder some of my scenes. Having them separated like this makes it really simple to do.

Get in the habit of starting a new document or sheet before each time you write a scene heading. This will allow you to easily rearrange scenes later without any cutting and pasting. Each scene will have its own document. This is one of the most powerful features of Scrivener and once you realize the benefit of it you’ll miss it with other apps.
4. Make Your Auto-Complete List And Check It Twice
This isn’t unique to Scrivener but it’s still something I suggest getting familiar with right away. Add any character names or anything else in this list you want to be able to auto-complete with. Go to Project Settings -> Auto-Complete List to make adjustments to your list. If you know who your speaking characters are going to be in your script you can enter them right away and the same goes for your settings.

Even if you decide not to enter your characters into the autocomplete list before hand knowing where this setting is can be handy. I don’t know about you but I always end up misspelling a character’s name or pressing return before I wrote out the entire name. That misspelling ends up getting logged in the autocomplete list and next time I go to type that character’s name the incorrect version is recommended. When this happens I go back into the autocomplete list and delete the incorrect versions. I do this every so often to make sure no misspellings found their way in there.
5. Utilize Typewriter and Composition Mode
Any tweak or feature that helps flow is awesome in my book. The typewriter mode is one of those features. Normally I’ll have to scroll the document and type at the bottom but with typewriter mode the line you’re working on is always in the center of the screen. This makes it really easy to keep writing and is another thing that helps flow.

Composition mode contributes to good flow as well by minimizing visual distractions and showing you only what you need to see. You can pull up menus or options as need be.


Having all of the important notes, ideas, documents and info for a specific project contained in one Scrivener project file was what initially drew me to the app.
Learning how to customize it and make the most of the features it has to offer are what keep me using it.
The following link is an affiliate link to Scrivener. If you haven’t purchased Scrivener yet and are thinking of doing so please consider utilizing this link.
I do get a small percentage of any purchases made through these links which will go toward keeping this blog running and providing me resources to improve this and my YouTube channel.
I would not recommend Scrivener let alone think of becoming an affiliate if I didn’t love the software. I hope it works out as well for you. Happy writing!


Leave a comment